Keurig Add Water Sensor Not Working?

The Keurig add water sensor is a crucial component of the popular coffee maker, designed to alert users when the water level is low and prompt them to refill the reservoir. However, some users have reported issues with the Keurig add water sensor not working as intended, leading to frustration and inconvenience.
When this sensor malfunctions, it can disrupt the brewing process and prevent the machine from operating properly.
A malfunctioning add water sensor can be caused by various factors, including mineral buildup, sensor blockage, or electrical issues.
Understanding the potential reasons behind this problem can help users troubleshoot and resolve the issue effectively.
In the following article, we will explore common causes of the Keurig add water sensor not working and provide practical solutions to address this issue, ensuring that users can continue to enjoy their favorite beverages without interruption.
How Keurig Add Water Sensor Works

Before we dive into troubleshooting the add water sensor issue, let’s take a moment to understand its role in your Keurig coffee maker. The added water sensor is a vital component that ensures the machine operates smoothly and efficiently. It detects the water level in the reservoir, allowing Keurig to initiate the brewing process.
Explanation of the add water sensor’s role in a Keurig coffee maker
Imagine the added water sensor as Keurig’s eyes when it comes to water level detection. When you fill the water reservoir, the sensor identifies the amount of water present. This information is relayed to the machine’s control panel, which determines whether there is sufficient water to proceed with brewing. If the sensor detects an inadequate water level, it will trigger an alert on the display, indicating that it’s time to add more water.
How the sensor works and detects the water level
The add water sensor operates on a simple principle: conductivity. It consists of a series of metal probes or sensors located near the bottom of the water reservoir. When water is present, it acts as a conductor, allowing a small electric current to flow through the sensors. This current is then registered by Keurig’s circuitry, indicating that the water level is sufficient for brewing.
Common reasons for adding water sensor issues
While the add water sensor may seem like a straightforward component, various factors can lead to its malfunction. Understanding these common issues can help us identify the root cause of the problem. Here are a few possible reasons for adding water sensor malfunctions:
Sensor calibration problems: Over time, the added water sensor may lose its calibration, causing it to inaccurately detect the water level. This can result in false alerts or failure to trigger the “add water” warning when necessary.
Blockage or debris interfering with the sensor: It’s not uncommon for debris, such as coffee grounds or mineral deposits, to accumulate around the added water sensor probes. This buildup can disrupt the conductivity and prevent accurate water level detection.
Electrical or wiring issues: In some cases, the additional water sensor problem might be due to electrical or wiring issues within the Keurig machine. Loose connections or damaged wiring can lead to faulty readings or complete sensor failure.
Recommended for you: Keurig All Lights On And Not Working
Troubleshooting Steps for Keurig Add Water Sensor
Now that we have a good understanding of the Keurig add water sensor and its common issues, let’s explore some troubleshooting steps to address the problem. These steps are designed to help you resolve to add water sensor malfunctions and get your Keurig coffee maker back to brewing perfection.
Perform a Basic Check
Start by performing a basic check to ensure that the issue isn’t a simple oversight. Follow these steps:
Verify that the water reservoir is properly seated and aligned with the Keurig machine. Sometimes, a slightly misaligned reservoir can prevent the added water sensor from detecting the water level accurately.
Check that there is sufficient water in the reservoir. It’s possible that the water level is genuinely low, triggering the “add water” alert.
Clean the Add Water Sensor
If the basic check doesn’t resolve the issue, the added water sensor might require cleaning. Follow these instructions:
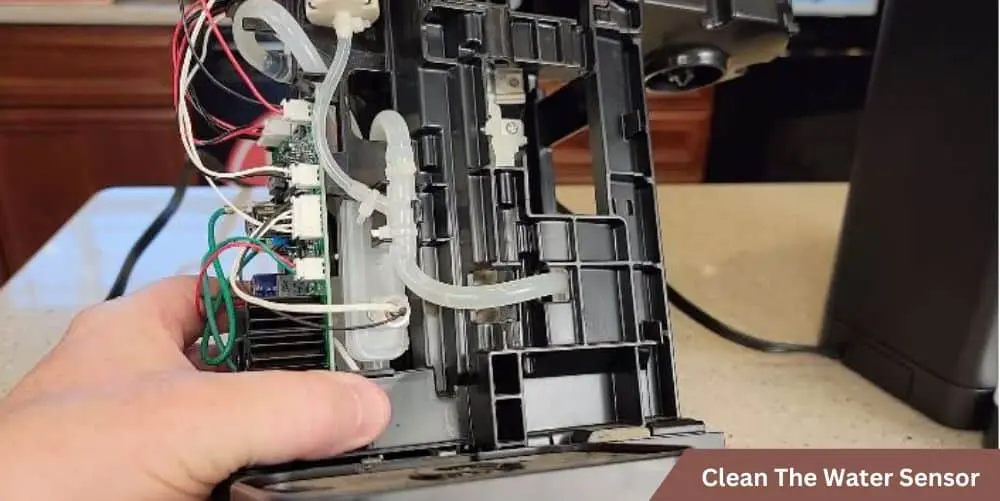
- Remove the water reservoir from the Keurig machine according to the manufacturer’s guidelines.
- Inspect the area around the add water sensor for any visible debris, such as coffee grounds or mineral deposits. Use a soft, damp cloth or a non-abrasive brush to gently clean the sensor area.
- Pay close attention to the metal probes or sensors near the bottom of the reservoir. Clean them carefully, ensuring there is no residue or buildup hindering their conductivity.
- Once the sensor area and probes are clean, reattach the water reservoir to the Keurig machine.
Check for Debris or Blockage
If the add water sensor issue persists, it’s possible that there is debris or blockage obstructing the sensor’s functionality. Follow these steps to check for and address any blockages:
- Turn off and unplug the Keurig machine.
- Remove the water reservoir and inspect the water inlet and outlet areas. Look for any visible signs of blockage or debris.
- If you notice any obstructions, carefully remove them using a soft brush or a toothpick. Be gentle to avoid damaging the Keurig’s components.
- Once you have cleared any blockages, reassemble the machine and test if the add water sensor is functioning properly.
Reset and Recalibrate the Keurig
If the previous steps didn’t resolve the issue, you may need to reset and recalibrate the Keurig machine. Follow these instructions:
- Turn off the Keurig and unplug it from the power source.
- Leave the machine unplugged for a few minutes to ensure a complete reset.
- Plug the Keurig back in and power it on.
Preventive Maintenance and Tips for Keurig Add Water sensor
Resolving the add water sensor issue is just the first step. To ensure the smooth and consistent operation of your Keurig coffee maker, it’s important to implement preventive maintenance and follow some helpful tips. Let’s explore how you can maintain your machine and prevent future add water sensor problems:
Regular Cleaning and Descaling
Regular cleaning and descaling are crucial for maintaining the optimal performance and functionality of your Keurig, including the added water sensor. Follow these guidelines:
Clean the external parts of the machine regularly, including the water reservoir, drip tray, and external surfaces. Use mild soap and warm water to clean, and avoid using abrasive materials that can scratch or damage the Keurig.
Descaling is essential to remove mineral deposits that can accumulate over time. Refer to your Keurig’s user manual for specific descaling instructions. Follow the recommended descaling frequency to keep the add water sensor and other internal components free from scale buildup.
Proper Water Reservoir Handling
The water reservoir plays a vital role in the functioning of the add water sensor. Follow these tips to handle the reservoir properly:
Refill the water reservoir with fresh water for each brewing cycle. Avoid leaving stagnant water in the reservoir for an extended period, as it can lead to bacterial growth or mineral deposits.
When removing or inserting the water reservoir, ensure a secure and proper alignment with the Keurig machine. This helps maintain accurate detection by the added water sensor.
Using Filtered Water
Using filtered water can have a positive impact on both the machine and the added water sensor. Consider the following:
Filtered water helps reduce mineral buildup, which can prolong the lifespan of your Keurig and prevent additional water sensor issues.
If your tap water has a high mineral content, consider using a water filter or purchasing filtered water for brewing. This can contribute to better-tasting coffee and improved machine performance.
Regularly Inspect and Maintain Electrical Connections
Electrical and wiring issues can also impact the functioning of the add water sensor. Follow these steps to ensure proper electrical connections:
Periodically inspect the power cord and plug for any signs of damage or wear. If you notice any issues, contact Keurig customer support for guidance on replacement or repairs.
Ensure that the Keurig is connected to a properly grounded outlet to prevent electrical issues that may affect the add water sensor and other components.
Conclusion
The add water sensor is a vital component of your Keurig coffee maker, ensuring that the brewing process starts smoothly and efficiently. If you encounter a malfunctioning add water sensor, it can be frustrating, but it’s not the end of the world.
With a little patience, diligence, and the troubleshooting techniques we’ve discussed, you can resolve the issue and enjoy your favorite cups of coffee again.
Additionally, regular cleaning, descaling, proper water reservoir handling, and using filtered water. These practices will help keep your Keurig in excellent condition and minimize the chances of adding water sensor problems in the future.